I’m almost certain that everyone reading this article has at some point considered starting mining Bitcoin or some other cryptocurrency, at least I have. However, many get bummed out when looking at how much it costs to buy the right equipment. Also, for some of us, it seems too technically difficult, and this results in missing out on potential profits. That’s why we have NiceHash.
NiceHash was founded in 2014 and they market themselves as the leading platform in cryptocurrency mining as well as trading. That’s quite a large definition and to narrow it down a little bit, NiceHash is essentially a hash power broker. Being a hash power broker means that it connects those who want to sell their hash power with those who buy it. In practice, if you use NiceHash they will distribute your hashing power to the highest paying pool which in turn pays NiceHash a reward which will be distributed to you. Because it’s an open marketplace, it ensures that the price you’re getting is the best one out there.
The Retail Miners Dream?
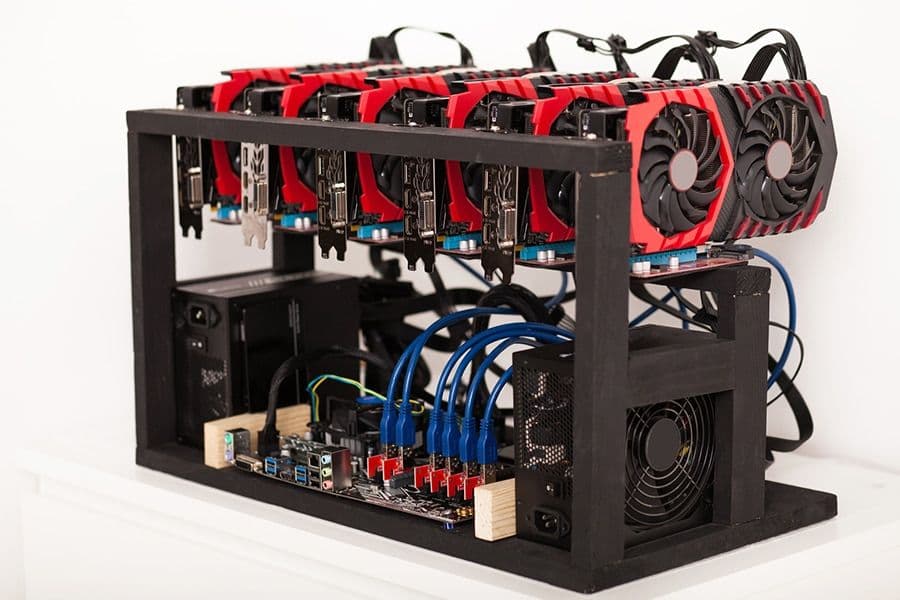
If you’re dreaming about starting a mining rig like the ones companies like Marathon and Riot have then NiceHash isn’t something you’re going to use. However, if you’re a gamer with a powerful PC sitting unused most of the time then NiceHash is for you. Depending on what graphics processing unit (GPU), and central processing unit (CPU) you have NiceHash can provide you with earnings up to $15 a day with only one GPU. And the best part of it all, you don’t have to do anything. Okay well, you must set it up which is why you have this guide. But before getting started I quickly want to address the supposedly high barrier of entry.
 Do you have a powerful gaming PC just lying around most of the day not making you any money?
 The user-friendly platform and the idea of exciting potential of profits might even provide you a reason to buy a PC or just a few GPUs to try it out. However, as we all know buying PCs with powerful GPUs isn’t cheap so you might think of it as too big of a risk. The good thing though if you buy the high-end GPUs is that they have an impressive resale value. Many claim that you’ll get at least ¾ of the initial price back on just the GPU, not to mention what an excellent quality PC could be worth. This is because research has proven that if a GPU is treated correctly, it won’t lose its power. NiceHash is great for this since they automatically configure your settings so that you get the most out of your GPU without harming it. Therefore, trying mining might not be as expensive as you think since you can always get most of your money back on the equipment.
Step 1: Equipment
The first thing you need to do is get yourself some equipment if you don’t already have some. If you’re not familiar with GPUs, then it might be incredibly difficult to know what is good and bad. Also, a GPU might be good in general while their suitability for mining not so good.
The best way to know what to use is to look at NiceHash’s profitability calculator. Here you can compare various hardware to know which one will deliver the best return on investment. In the calculator you also need to include the electricity cost and I strongly suggest you use the most exact rate. If you don’t know the price then you need to search for some average prices around your area and use the highest one you find. This is because it’s not nice to buy equipment just to realise that your electricity costs were higher than expected and you’re making no profit.
Another suggestion I would make is to not be too cheap when buying equipment. If you can afford to go for the newer ones then that might be a desirable choice. This is mainly because of the resale value but also because older ones just aren’t that good for mining. And then lastly, double check before buying. Check from other sources than NiceHash whether the GPU you’re buying is really good, and then check that all the details are the same on the one you’re buying, and the one you’ve researched.

Step 2: NiceHash Miner or QuickMiner
After you’ve got your equipment ready it’s time to look at what we’re going to be using. NiceHash offers three different software options for mining, NiceHash Miner, QuickMiner, and OS. The reason we’re going to stick to talking about only NiceHash Miner and Quickminer is because those two are the ones the majority use. They both require the windows operating system opposed to OS which requires Linux.
Now, deciding if you’re going to use NiceHash or QuickMiner basically depends on your GPU. If you’re using Nvidia then I would suggest QuickMiner but if you’re using something else you will have to go with NiceHash since QuickMiner only works with Nvidia. The big difference between these two systems is that QuickMiner uses mining algorithms developed in-house by NiceHash itself and NiceHash Miner uses 3rd party miners. The reason I therefore would use QuickMiner is that according to NiceHash, these 3rd party miners are often unverified and the lack of information surrounding them might make them untrustworthy. Always better to be safe rather than sorry.
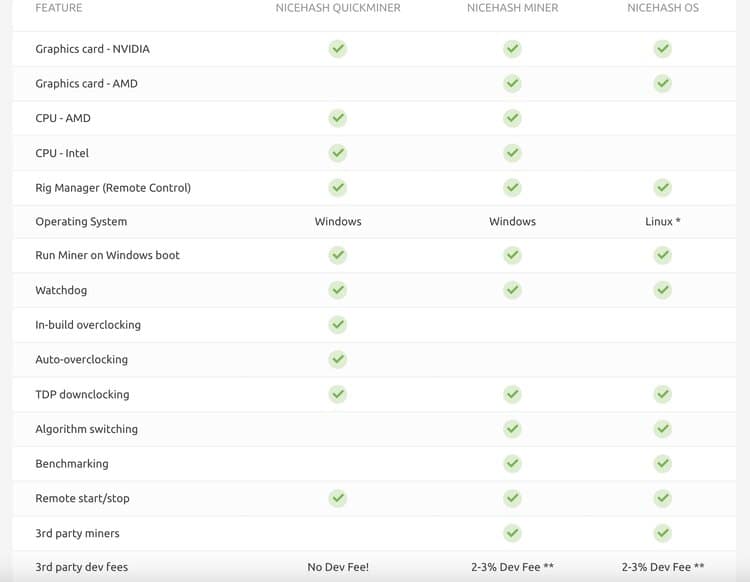 Basic rule, if you use Nvidia then pick QuickMiner. Image via NiceHash.
 However, if you use NiceHash Miner you can use a benchmark tool which will check all the 3rd party miners and see which one is the most efficient. What I found out when reading the reviews and comparing these two is that although NiceHash benchmarks all the 3rd party miners, QuickMiner is still just as good or even better. This is also partly because when using QuickMiner there are no developer fees to NiceHash, opposed to a 2-3% fee if you use NiceHash Miner.
With both systems you will be paid in Bitcoin. This is because you’re basically not mining but rather just selling your hash power. At least with QuickMiner you will be selling your hash power to Ethereum mining since it’s the most lucrative right now. However, NiceHash will pay your rewards in Bitcoin regardless of which crypto is mined. But no worries, you can always exchange that to Ethereum or some other altcoin on NiceHash’s exchange.
Step 3: Getting started
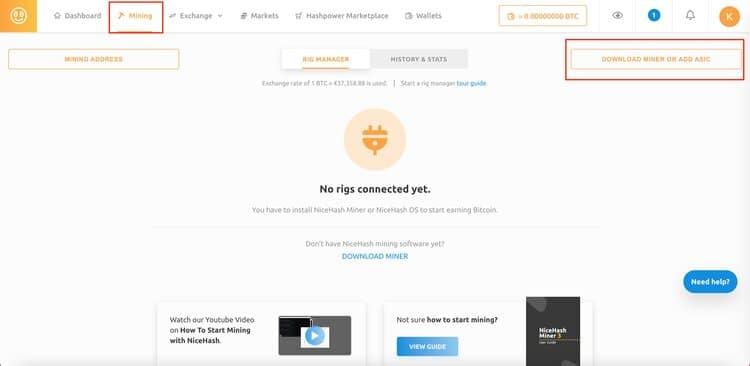
Now, after you’ve decided on both your equipment and your software it’s time to start mining. To do this you need to enter NiceHash and create an account. After this you’ll enter your NiceHash dashboard from where you’ll press the button “mining” from the top menu. Then from there press “Download miner or add ASIC”. Before downloading you need to disable windows defender by making NiceHash an exception. Windows defender is an anti-virus program, and it can interfere with NiceHash if not dealt with. You’ll find instructions to this from NiceHash on the download page.
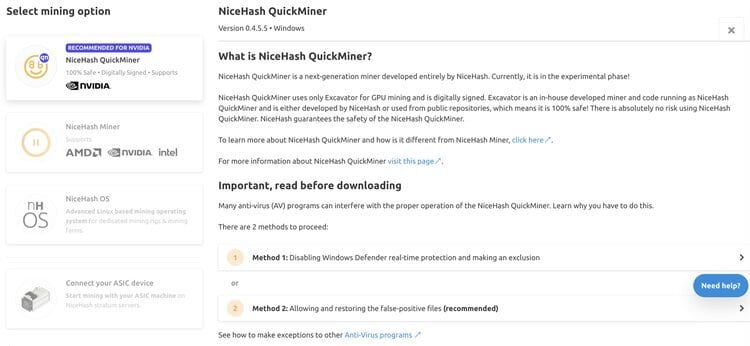 From here you'll find everything you need to successfully download QuickMiner. Image via NiceHash.
 If you’re using QuickMiner you only need to download the basic package but if you use NiceHash Miner, then you’re going to need to choose which 3rd party mining algorithms you want to use. My suggestion would be to download them all and then let the NiceHash benchmark tool choose which one works best for you.
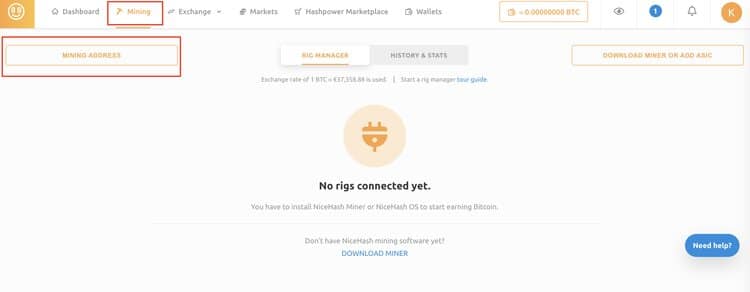
In the downloading process you’ll be asked about your mining address. This you will find when going to your mining rig, from the top menu press “mining”. Then in the top left corner you’ll see a square with the text mining address. Then just copy and paste the address. You’ll also be asked to name your rig, and you can name it whatever you like.
After you’ve downloaded everything that’s needed, you’re good to go. QuickMiner should automatically take you to your rig manager and it should show you your device there. It also automatically starts mining. With NiceHash Miner you have to manually press the play button from your controls. Now there’s just some small setting tweaks you can do to make mining more suitable for you. For example, many turn off CPU mining since it isn’t that lucrative and when mining with your CPU it makes it impossible to use your PC at the same time since it will be so laggy. Another thing to point out is that the settings with QuickMiner and NiceHash Miner are a bit different. QuickMiner for example has overclocking settings and auto restart which are good to keep turned on. QuickMiner also allows you to choose how much work you want your device to put in on mining. Then based on your choosing it will automatically adjust all the necessary GPU and mining settings. I’m not going to go too deep into these setting since many of them are written in plain English and it’s up to you to choose what you want and don’t.
However, the thing that can be more difficult is adjusting your GPU. I must admit that I’m no expert on these and I’m maybe not the best to speak about this which is why I won’t do that. If you use NiceHash Miner, you need to look at which settings on your GPU fit the best with these 3rd party algorithms. The best way to do these is just to search on Google or YouTube, there are loads of content for this. You need to search this based on which GPU you're using, which is why I haven't included any links here. For QuickMiner it should automatically adjust everything so that it works efficiently.
Now that everything’s set up you just have to press the big play button for Nicehash Miner to start mining, QuickMiner should already be mining to start mining. Then if you want to use your PC for gaming or something else you simply turn mining off. Then after you don’t need the PC anymore you turn mining on and enjoy the passive income that you get.
Step 4: Enjoy the Profits
After you’ve been mining for a while, you will start seeing your balance grow. NiceHash will pay you every four hours and always in Bitcoin. What I would suggest for you to do is to regularly withdraw your funds to a wallet. However, if that’s not something you prefer you can always use NiceHash’s exchange to trade your BTC to, for example, Ethereum and then withdraw that to any wallet that supports Ethereum, but this will come with a fee.
 Now you can proudly call yourself a miner. Enjoy the free BTC.
 When it comes to your estimated earnings you should have a fairly good idea on what’s coming if you used the calculator. However, you need to remember that due to the volatility in crypto prices your earnings counted in a fiat currency will fluctuate. On top of that you’ll also need to keep your eyes on your electric costs since for many contracts they too tend to fluctuate and if they do that a lot then it can eat up your profits.
Lastly, in many countries earning a passive income like this is taxable, even if you aren’t earning a lot. Therefore, find out how taxation on mining income works in your country before starting. By doing this you’ll avoid some unpleasant conversations with the tax authorities. And of course, if that income is taxable in your country, remember to pay it in time.


Word of Warning
When looking at a new platform it’s important to know all the facts, especially if we’re talking about a software that will be downloaded on your PC. One of the founders of NiceHash, Matjaž Škorjanc, is a convicted cybercriminal. He created a malware that infected PCs and scanned for information including passwords and bank details. This combined with the need to turn of anti-virus software when downloading NiceHash can make some a little skeptical. And to make it worse, NiceHash has been hacked once in 2017 and it resulted in $64 million getting stolen. However, those stolen funds were reimbursed, last of it two years after the hack.
 Here's a good article if you're interested in diving in deeper. Image via Krebson Security.
 So, how can you protect yourself? Well, for a starter, don’t leave your coins on NiceHash. Instead, as soon as you have a certain amount of earnings it would be wise to move your funds to a wallet. Two good options you can directly move your funds to from NiceHash are the Coinbase wallet or a cold storage choice like the Ledger hardware wallet. On top of securing your cryptos I would also not use the PC you’re mining with for things of high importance. This I would do just as a precaution, I believe that NiceHash is perfectly fine but just be sure it would be good to maybe access your bank account from another computer.
Conclusion
As you’ve probably noticed by reading this article, starting a crypto mining project isn’t that hard. Especially for those of you who already have a powerful PC, it’s a no brainer to start mining rather than not doing anything with your PC 16 hours of the day. The profits are completely passive and considering how little you must do to set it up there’s no better alternative. Then if you feel like you’re not getting enough you can simply buy another GPU and double your earnings.
For those of you who still feel skeptical about starting mining there’s not much more I can say. This opportunity to be a part of something great from quite the early stages should be enough to convince you to start. Just imagine what those Bitcoin you manage to mine now will be worth if, and when Bitcoin hits $500k like Cathy Wood predicts will happen by 2025. Those BTC fractions will be worth what some would even call life changing amounts, and with little to no effort and an initial investment of only about $2000. Therefore, if you by any means have the opportunity to try this then I suggest you do that.