So you were searching online for some free cryptocurrency trading bots and you came across the Gekko trading bot.
This is perhaps one of the most helpful open source cryptocurrency trading bots on the market today. No need to pay subscription fees for some scammy trading software with questionable returns. Cryptocurrency is meant to be an open source endeavour. Our crypto trading bots should be the same.
The Gekko trading bot is open to anyone who is willing to invest a bit of time setting it up. Moreover, it allows for numerous extensions and plugins that you can use to improve on the bot should you require.
In this post, we will take you through the Gekko Trading bot. We will also show you how to set it up on a cloud server so that you can leave it analysing the markets without interruption.
Although we would like to think that this is relatively straightforward, these instructions do require a basic understanding of the Linux command line as well as VPS servers.
With that disclaimer out the way, let's jump in.
What is the Gekko Trading Bot?
The Gekko trading bot is a simple cryptocurrency trading bot and back testing tool. It was developed by Mike Van Rossum and was released as an open source piece of software. Gekko trading bot can link up to 18 different Bitcoin exchanges
Gekko was developed in Node.js and all of the code for Gekko has been released on Github. This repository is also regularly updated which is a good sign that the developers are still active.
Gekko can be used for three different purposes:
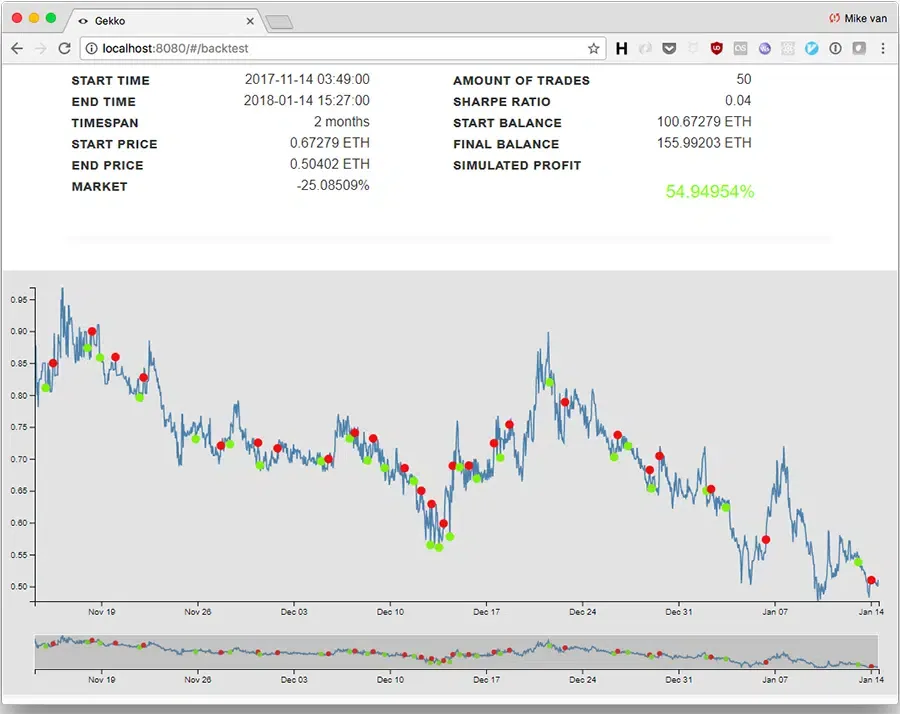
- Backtesting: You can backtest any strategy that you have over a period of time in the past. This is helpful to determine the effectiveness of a strategy would have had.
- Paper Trader: You can test the strategy in real time with current data but only to make "phantom trades" with fake money.
- Trade Bot: Here you can run the bot with real funds in an account with the strategies that you have developed.
Gekko is not a high frequency trading bot or an arbitrage bot. It completes technical analysis on cryptocurrency markets and places a few trades per day. It allows you to create your own strategy based on your own indicators.
 Gekko Trading Bot UI
You can control the bot through a user interface on your browser just like you would on any other platform. If you have the bot running on cloud server then it will be analysing the markets 24/7.
It is important to note that while the Gekko bot has a graphical user interface, it does require a little bit of coding in order to set it up. It also requires you to install a few programs and dependencies in order to make it run efficiently
Getting Your VPS Server
Before I progress, I thought it would be important to state that the Gekko trading Bot can be run in a local environment on your home PC. There are numerous instructions just how to do this.
However, we found this less efficient than using a VPS that is running uninterrupted at a data centre. Servers are better suited to automated trading software and we found no exception with the Gekko trading bot.
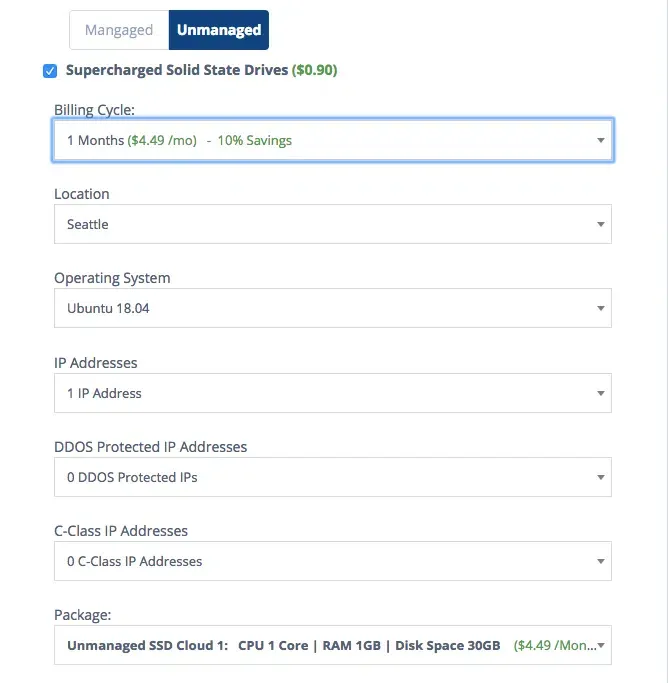
Hence, you will need to purchase yourself a VPS. These can be bought at a range of hosting providers but we found that the most affordable are the VPSs that are for rent on Hostwinds. You can get a VPS for a mere $5 a month.
We are going to be purchasing the entry level server. We will also want to order an unmanaged server as we want to install all the packages ourselves. When you are given the operating system option, choose to build the machine with Ubuntu 18:04.
 Minimum VPS Server Stats Required
Once you have paid for the server, deployment should take place within the next 30 minutes. You will get an email giving you the server’s login credentials and your “root” password. You will also be given your server’s IP address.
Now that you have a server, you will want to get yourself a domain name so that you can easily access user interface of Gekko through an SSL secure connection.
Setting up The Domain
You can easily get a domain from a registrar such as namecheap for less than $2. You will only have to renew the domain in 1 year if you would still like to use it.
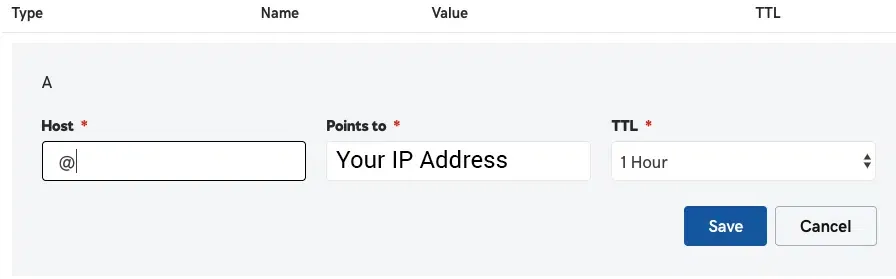
Once you have purchased the domain you will need to change the nameservers to your given IP address. All you will need to do is add an A record and point it to the server that will host Gekko. This is a simple change which is done in your domain’s nameserver section. Below is a screenshot of the nameserver setup on my domain.
 Domain Name Settings in Name Server Section
Usually, changes to the domain A records should take no more than an hour to propagate. Now that your domain is set up, you can begin configuring the server to run the Gekko trading bot.
Configuring the Server
In order to run Gekko on your VPS, you will need to get an SSL certificate as well as upstream it through a webserver. These step-by-step instructions will show you exactly how to do it.
In order to make any changes on your VPS you will need to access it through SSH. If you are trying to set up Gekko from a Mac machine then you can access it through your terminal. If you are using Windows then you will have to download an SSH client such as Putty.
In the email that you were sent by your hosting provider you will have the server’s IP as well as your login credentials. Once you have logged into your server you can begin configuring the settings. Before you get started you may want to update your repositories. All you need to type is
$ apt-get update
Firslty, you will need a webserver through which the Gekko UI will be served. We have decided to use the Linux Nginx server. This may or may not be pre-installed on your VPS (depending on how it shipped). In order to quickly install the nginx repositories, you type the following command:
$ apt-get install nginx
Follow the instructions, and accept the changes. Once the server is installed, you can start it and check whether the domain is correctly propagated and the server is fully functional. Start the server with the following command:
$ service nginx start
Now you can visit yourdomain.com and see whether you get presented with the nginx welcome screen. If this is the case we can move onto the configuration of the server. Stop the process beforehand with the following command:
$ service nginx stop
Now you will have to navigate to the nginx config file and make a few changes. In order to edit our configuration file you will need to use a text editor. We are going to be using nano. Type the following command:
$ nano /etc/nginx/sites-enabled/default
Now you will be presented with the configuration file that you can edit in Nano. You will to edit the first section with the following:
listen 80; listen [::]:80; return 301 https://$server_name$request_uri;
Then you will want to rename your server. Scroll down in the file to the line that says server_name and insert your domain as below
server_name yourdomain.com;
Lastly, you will want to set the server up as a secure reverse proxy. Navigate to the bottom of the file and insert the following lines:
upstream websocket { server localhost:3000;}
server { listen 443 ssl; listen [::]:443 ssl; root /var/www/html;
ssl_certificate /etc/nginx/ssl/nginx.crt; ssl_certificate_key /etc/nginx/ssl/nginx.key;
location / { proxy_buffers 8 32k; proxy_buffer_size 64k;
proxy_pass http://websocket; proxy_set_header X-Real-IP $remote_addr; proxy_set_header Host $http_host; proxy_set_header X-Forwarded-For $proxy_add_x_forwarded_for; proxy_set_header X-NginX-Proxy true;
proxy_http_version 1.1; proxy_set_header Upgrade $http_upgrade; proxy_set_header Connection "upgrade";
proxy_read_timeout 86400s; proxy_send_timeout 86400s;
auth_basic "Restricted Content"; auth_basic_user_file /etc/nginx/.htpasswd; }}
Now you can close out of your Nano editor. You do this by typing “CTRL X” and then “Y” to save over the file that is already there.
The server should be appropriately configured. We will come back one more time once we have finished obtaining our SSL certificates.
Getting Your SSL Certificates
Accessing Gekko securely through an https connection is highly important. This is especially true if you choose to insert any exchange API keys for automated trading. Hence, in order to establish a secure connection you will have to obtain an SSL certificate.
You will firstly want to download openssl in order to sign your certificates. Type in the following command:
$ sudo apt-get install openssl
This will install the open source SSL toolkit. Once that is installed on the VPS you can go ahead and create a new SSL key.
$ sudo mkdir /etc/nginx/ssl $ sudo openssl req -x509 -nodes -days 365 -newkey rsa:2048 -keyout /etc/nginx/ssl/nginx.key -out /etc/nginx/ssl/nginx.crt
In this process they will ask you a bunch of questions such as email, company name and address. You do not have to fill these out and you can merely hit enter to skip through the questions.
Now you will want to obtain a free Let’s Encrypt signed certificate for the domain. You will need a client installed on your server that can obtain these signed certificates. Certbot is the recommended program and you can install it with the following command.
$ sudo apt-get install certbot
Accept the installation request and wait for the product to finish downloading and installing. Then you will want to run the following command with “yourdomain.com” replaced with your actual domain
$ certbot certonly --standalone -d yourdomain.com
Complete the steps and agree to the terms of letsencrypt. If there are any errors in obtaining your certificate it could be that your nginx server is still active. Make sure that it has been turned off as instructed after the configuration change.
The final step in this stage of the installation is to modify your nginx config file in order to let it know where the certificate and its key are stalled. We also want to add a header control instruction. Open the file again with the same command:
$ nano /etc/nginx/sites-enabled/default
Once open, navigate to the server’s SSL configuration instructions and you will see the following two lines:
ssl_certificate /etc/nginx/ssl/nginx.crt; ssl_certificate_key /etc/nginx/ssl/nginx.key;
Replace it with the following (remember to change “yourdomain” to your actual domain):
ssl_certificate /etc/letsencrypt/live/yourdomain.com/fullchain.pem; ssl_certificate_key /etc/letsencrypt/live/yourdomain.com/privkey.pem; add_header Strict-Transport-Security "max-age=31536000";
Now your server has been appropriately configured as a secure reverse proxy. The final step is to create a password that makes sure you are the only person who is able to access your gekko trading bot. Type the following command into the command window with “username” replaced with your desired username.
$ printf "username:`openssl passwd -apr1`\n" >> /etc/nginx/.htpasswd
Hit enter and insert a chosen password when prompted. Now you can turn your server back on to make sure that the environment is correctly configured to run the Gekko bot.
$ service nginx start
If you wanted to check that the configuration was successful you can visit your domain at yourdomain.com. We recommend using the Chrome browser as there were issues on browsers such as Firefox.
You should be prompted for your login credentials. If inserted correctly it should take you to a 502 Gateway error page with a secure SSL connection (green SSL padlock in browser).
This means that they configuration has been done correctly and you are all ready to download and set up the Gekko trading bot.
Installing Nodejs & NPM
The Gekko bot is coded in nodejs, the server side implementation of JavaScript. This means that you will need to download and install nodejs on your server. Ubuntu 18:04 contains a version of node in its defualt repositories. In order to install it simply type:
$ sudo apt install nodejs
We also want to install Node Package Manager (NPM). This is used in order to download some of the dependencies of the Gekko bot. Run the following command:
$ sudo apt install npm
Depending on the version of Linux you are running, you may have to update the default version of Node.js that is downloaded. For Ubuntu 18:04, the default version installed from the repositories is v8.10.0. This is slightly outdated and will not be able to run the Gekko Bot as it requires a minimum of v8.11.2. You can check which version you have installed.
$ nodejs -v
If it is less than v8.11.2 then you will have to update it. In order to update node, we are going to have to use a PPA. Enter the following command.
$ cd ~ $ curl -sL https://deb.nodesource.com/setup_8.x -o nodesource_setup.sh
Then you will have to run the shell script that you just downloaded. Enter the following command:
$ sudo bash nodesource_setup.sh
After the script has finished running you can now install the latest version of Node.
$ sudo apt install nodejs
It should be v8.11.3 at the time of writing. This is now sufficient to run Gekko with. Now that we have the correct version of Node installed, we can download the Gekko Bot.
Installing The Gekko Bot
The final thing that you will need to install is the mean machine itself. You will need to download all of the Gekko files from the project’s github as well as the dependencies that it requires to run it. Navigate back to your root folder and type the following.
$ git clone git://github.com/askmike/gekko.git -b stable $ cd gekko
Now you have downloaded all of the files from Gekko’s github page and can start downloading all of the dependencies required by Gekko. Do so with the following npm code:
$ npm install --only=production
You will also need to download the dependencies for Gekko’s broker functionality. You will need to navigate to the exchange folder and then download these.
$ cd exchange $ npm install --only=production
Now your Gekko trading bot is about ready to run. You just need to edit the UIconfig file in order to serve the User Interface in a headless environment through port 443. The particular file can be found at gekko/web/vue/dist/UIconfig.js. Navigate to the file and open it with your nano text editor. Replace the CONFIG with the following:
const CONFIG = {
headless: true,
api: { host: "127.0.0.1", port: 3000 },
ui: { ssl: true, host: "gekko.example.com", port: 443, path: "/" }, // change this if you are serving from something like `example.com/gekko`
adapter: "sqlite",
};
As always, don’t forget to replace “yourdomain.com” above with the domain that you have bought. Close out of the editor and save your changes.
Running Your Gekko Trading Bot
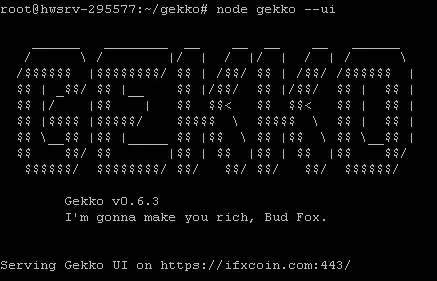
Now that Gekko has been installed and you have configured it to run in on your server in a headless environment, you can start it up. Navigate to your Gekko folder and enter the following command:
$ node gekko --ui
This should fire up Gekko and tell you that it is running on your domain. You should get the following output.
Output When Gekko Is Running Properly
Now you can check whether Gekko is working appropriately. Navigate to your domain and enter the password. You will notice the server responding to your requests in the command line. Enter your username and password and launch the beast.
 Gekko Bot UI in Browser
Gekko should be fully functional and you should be able to use it just as it was intended. However, there is one final step that needs to be completed if you want to run Gekko 24/7 even after you close your SSH session.
Let’s stop the Gekko script by typing “CTRL-C” and lets intall “screen”.
Running Remote Gekko Script Perpetually
You may have noticed that if you exit your SSH session, the Gekko script will also be shut down. This is because the Gekko application is tied to your SSH session. In order to run it even when you exit, you will have to use a terminal emulation tool. There are a number of ways to do this but I find the most effective way is to use the screen tool. This comes installed with Linux.
If screen is not installed on your machine you can do so with the standard install command.
$ sudo apt-get install screen
Once that is complete all you need to do is start the screen session with this command:
$ screen
Now you have a screen session that has been started. It is within this screen session that you can start the Gekko process. Hit enter and then insert the same command that you used already to start Gekko, namely:
$ node gekko --ui
Now you can exit from this particular screen session by typing “CTRL-A” followed by “d”. You should get an output such as the following:
[detached from 23904.pts-0.hwsrv-295577]
Now you can safely log out of the SSH terminal and the Gekko script is still running. You can check this by visiting the domain one last time. This means that until you stop the process or unless the server reboots, Gekko will keep running.
It is pretty simple to reattach to the session that you have running by typing the following command:
$ screen -r
Here, you can observe what Gekko is doing or you can stop the process. The latter may be done in case there were any changes that you wanted to undertake and could not do while it was running. You can always start the script up again by opening up the same screen. You can read more about all the screen commands here.
Using the Gekko Bot
Now that the Gekko has been installed on your server and it is running 24/7, you can access it from anywhere and craft your strategies using the tools. While this tutorial will not take you through all of the tools and functionality, we will give you a basic overview of how the Gekko trading bot operates.
As mentioned, Gekko makes use of technical analysis in order to do its back testing and placing of trades. It will use a range of standard technical analysis indicators that you define in order to execute the orders. Below are a list of the standard indicators.
- EMA: Exponential Moving Average
- PPO: Percentage Price Oscillator
- CCI: Commodity Channel Index
- DEMA: Double Exponential Moving Average
- LRC: Linear Regression Channel
- MACD: Moving Average Convergence Divergence
- RSI: Relative Strength Index
- TSI: True Strength Index
- TSI: Ultimate Oscillator
These are the standard signals that you can use to place your trades. You can also make use of other open source technical analysis libraries to further extend your options when writing your own strategies. You can make use of the Talib Indicators as well as the Tulip library.
Before you actually begin to use the Gekko bot to place trades in an automated fashion, you will want to test the strategies out via back testing. In order to do this you will need to import data.
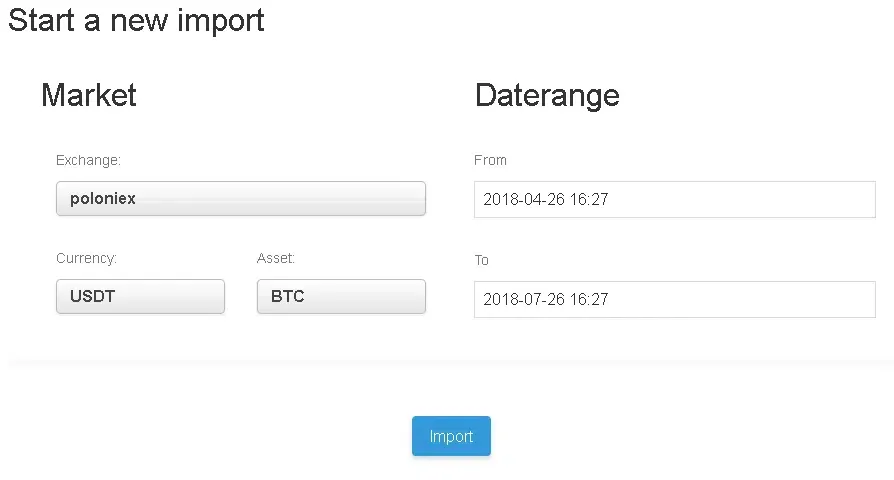 Local Data import on Gekko
You can pull data from 7 different exchanges and you test your strategies in the backtest. These include the likes of Kraken, Binance, Bitfinex and Poloniex. If they work for you then you can start testing these strategies on the live paper trading module. This can be started in the “Live Gekko” tab. Here, you can set the parameters that worked for your backtesting and implement it.
This will allow you to determine whether your strategy can indeed work in a live environment. You may also tweak your strategy based on what you observe from the paper trading results.
If you find that the paper trading has been working well for you then you can implement the same strategies in live trading mode with the “tradebot” functionality in “Live Gekkos”. Before doing this you will want to make certain that you have input your API keys and have write access on these API keys.
Extensions, Plugins and Custom Software
While the standard Gekko functionality will be sufficient for most people, there are a number of ways in which it can be improved with the numerous extensions that one can build in.
While this is no doubt exciting it is important to note that this requires custom coding to the Gekko files which makes it quite technical. You should only do this if you have a fair understanding of nodejs.
If you see yourself doing this then you can really unlock the power of the Gekko bot. For example, you could extend the Exchange functionality by adding new exchanges. Assuming that the Exchange has an API then you can connect it to Gekko and use the strategies to trade a range of different pairs.
You could also add a plugin that exists in the gekko/plugins folder. There are already quite a few that could be beneficial to your trading. You can see a list of these plugins below. You should read the documentation if you wanted instructions in order to activate the plugins.
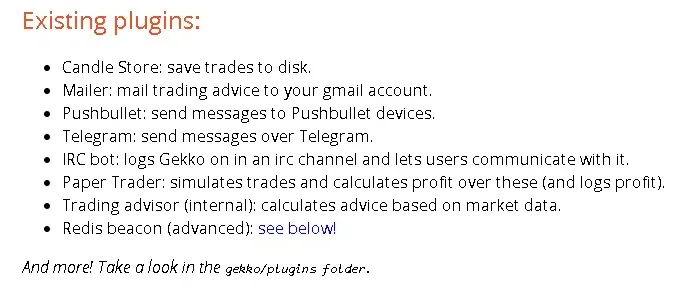 Available Gekko Plugins. Source: Gekko Documentation
Lastly, given that Gekko can launch a process that exposes an API, there are range of options to build on top of Gekko. There have been a number of people who have already done just this. For example, there is this plugin that will submit all of your trades to Google sheets for easy tracking.
There is also a more advanced trading strategies that uses genetic algorithms & bayesian evolution. Called Japonicus, this plugin is coded in Python which shows the extensibility of the underlying Gekko software.
Conclusion
When it comes to free automated software, the Gekko trading bot has no doubt created a name for itself. It is great to see that developers in the cryptocurrency space are keeping true to open source initiative.
While the Gekko trading bot can be seen as “simple” by most algorithm developers, it is this simplicity which is a great building block for more advanced functionality. It is also a great way for new bot builders to cut their teeth in the field.
It is, however, important to note that the Gekko bot is not magic formula that is going to make you money. You need to appreciate that trading such a volatile asset such as cryptocurrency can be risky for even the most advanced bots.
Gekko is a nice tool which you can use to most appropriately craft a strategy which exhibits positive returns. Yet, this is not guaranteed and you should always practice appropriate risk management.
With that being said, the Gekko bot is a great initiative and the developer deserves our collective gratitude. Show him you mean it by adding to his BTC tipjar: 13r1jyivitShUiv9FJvjLH7Nh1ZZptumwW