When it comes to mining cryptocurrencies today, people are investing in the most advanced GPUs and ASICs in order to compete.
Even then, once they have made a substantial investment in the hardware, they are in constant battle with some of the larger mining giants that have industrial-scale operations. This can be a disheartening fact for those just considering mining coins today.
However, there is a particular cryptocurrency that you can mine on your hard-drive right now. This is Burstcoin and it uses a unique and ingenious consensus algorithm that does not require hashing power.
In this post, we will take you through a step-by-step guide that will have you mine burstcoin. Let's jump right into it with a quick overview of the Burstcoin mining protocols.


PoW vs. PoS vs. PoC
Most of you are probably familiar with the Proof of Work protocol used in Bitcoin mining. This type of mining requires your computer to use its CPU to contribute computational power and solve cryptographic problems or hashes.
Those lucky enough to solve a hash and find a block receive a reward and the transaction fees from that block.
The intent of this protocol is to ensure one person doesn’t become too important to the network. Miners need to consume electricity and computational power to find coins, but they also need more and more electricity to become a larger part of the network.
Why is this important?
It pretty much guarantees that there is a very small probability that any one miner will control a majority of hashing power and be able to launch a 51% attack. It’s simply too expensive to do so.
Even if a miner could control more than 50% of the network it’s likely that he or she would protect the network to maintain their source of mining revenue. This has actually happened with other coins.

Over the years that Bitcoin has been in existence this system has proven to be quite efficient, but also extremely wasteful. The Proof of Work protocol has caused tens of millions of dollars worth of electricity to be consumed.
But now there are other consensus mechanisms. Proof of Stake is one that is well known.
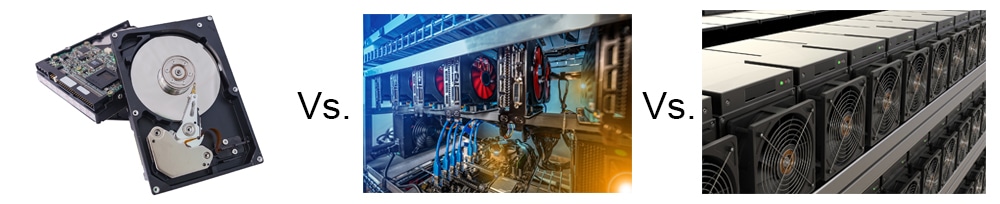 Battle of the Consensus algorithms. Image Source: Fotolia
Another less known protocol is Proof of Capacity. This protocol is used with Burst (BURST) and has proven to be far less costly.
Why is it less costly?
Because Proof of Capacity relies on your computer’s hard drive space rather than computing power. Those with larger HDD space being applied to the network get a larger share in their mining efforts. It’s not time-proven like Proof of Work, but it is far more environmentally friendly and sustainable long-term.
Burst mining can be carried out by anyone who has spare, unused hard drive space. You can even build rigs of hard drives to increase your profitability when mining. This has an additional benefit over GPU and CPU mining besides the lowered electricity consumption. Hard drives also have a far greater life expectancy when being hammered 24/7, so you won’t need to replace them as often as GPUs and CPUs.
No matter if you just have a few GB of space available or a few TB you can mine Burst, so let’s get started learning about Burst mining!
Part 1 – Install Burst Wallet
The Burst wallet is available as an online wallet, a mobile wallet, and a local desktop wallet. When mining, for security reasons it is recommended that you use the local desktop version. It’s available for Windows, Linux and Mac and the wallets can all be downloaded from the Burst site here.
Windows users have a choice between using the Burst core wallet or the QBundle wallet. The easiest choice for beginners on Windows is to download Qbundle, a launcher allowing you to install the Burst local wallet in a few clicks. You can simply follow the wizard walking you through the set up. Qbundle also includes plotting and mining software to start mining easily.
So let’s take that route since it’s easiest.
The latest QBundle release is available on GitHub and can be downloaded here. The current version as of this writing is 2.5.0 which is available as a .zip file. Click the link and save the .zip file to your computer. When you open the .zip folder you’ll need to extract it before running.
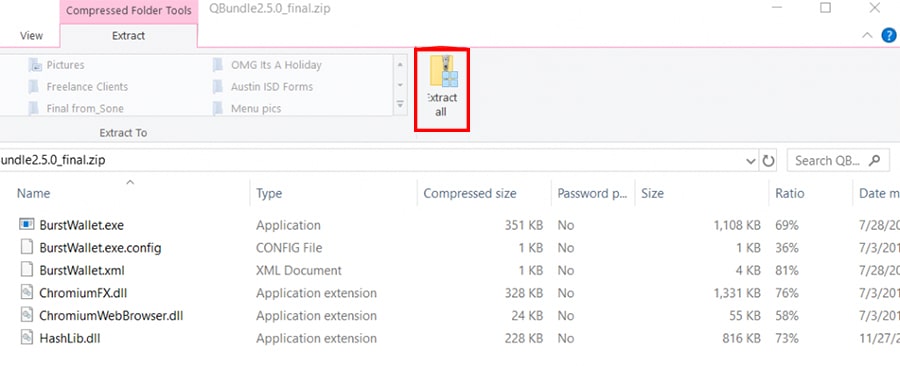 Unzip the files
After unzipping you can go into the new folder and double click the BurstWallet.exe file to run the wallet for the first time.
You might get a message that Windows Defender protected your PC and blocked the app from opening. If this happens click the “More info” link and you’ll get a button that says “Run anyway”. Go ahead and click that button.
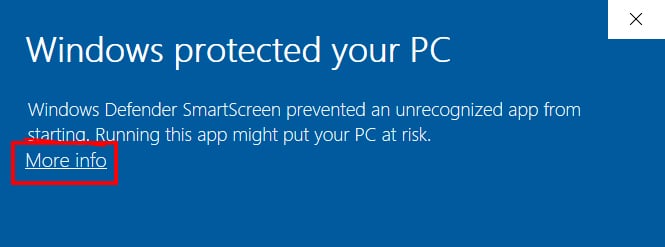 Run the application anyway in Windows Defender
The installer will look for missing components and let you know if anything is needed. If it is you can click the “Download missing components” link to get what’s needed.
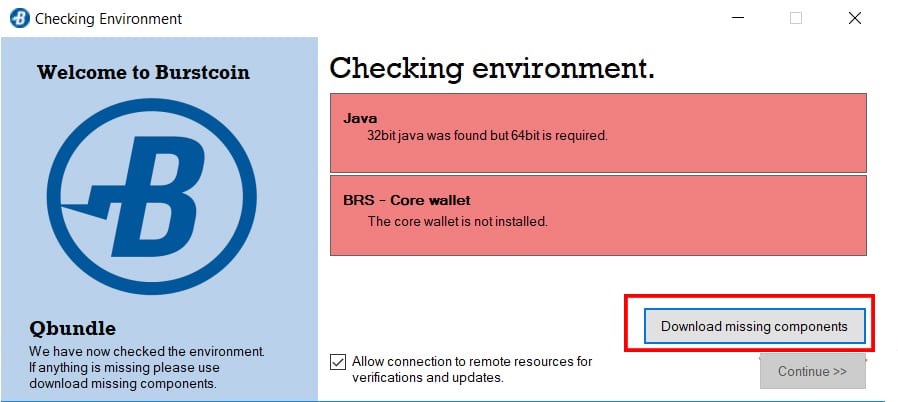 Proceed to download the missing components
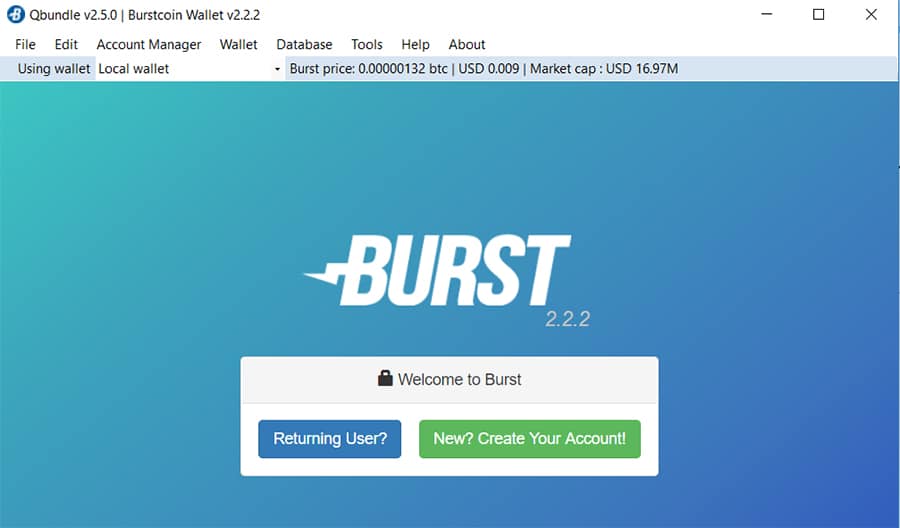
Once the missing components have been downloaded you can click the “Continue” button. That will begin to download and install the Chromium Pocket Browser needed to run the Burst wallet. Then the Burst Wallet will open and you can click the button that says “New? Create your account”.
 Create a new burstcoin account
You’ll immediately be presented with your passphrase. Write it down and keep it safe. If you lose your passphrase you also lose access to your Burst account. Once you’ve copied the passphrase down click “Next”.
Burst will now ask you to provide your passphrase. This is to ensure you’ve actually copied it down. Type or paste it in the box and click “Next”.
That will take you into your new Burst wallet. Congratulations! As you’ll see the wallet will begin downloading the blockchain.
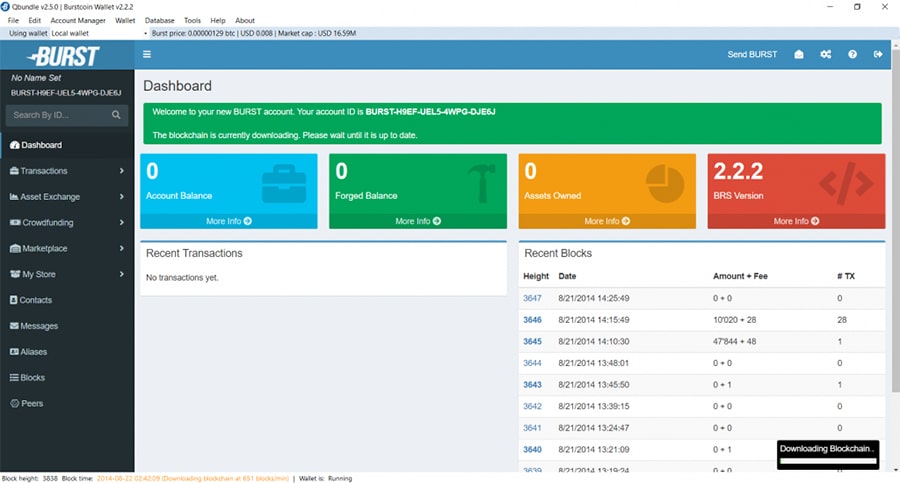 The burstcoin dashboard
In order to secure your ID, you’ll need to fund your wallet and make a transaction or any action that requires a BURST fee. This is required in order to start mining.
Part 2 – Fund your Wallet and Secure your ID
You have two options to get some Burst into your wallet so you can begin mining. The first is to simply buy it from an exchange. Burst is quite inexpensive and you won’t have to spend more than a few pennies to get enough Burst to begin mining. You can buy Burst from either Poloniex or Bittrex.
The other option is to use a cryptocurrency faucet to get some Burst. This method is free, but unfortunately this is hit or miss as many Burst faucets are regularly empty. You can try these faucets to get a small amount of Burst:
- Burstcoin.cc Faucet
- BurstPay Faucet
- Freeiz Burst Faucet
- Faucet.Burstcoin.ml – This will actually use your CPU to mine Burstcoin. Getting 1 Burstcoin will probably take you several hours or longer depending on your CPU.
If you’re planning on using one of the faucets please remember to use your Burst ID (like this: BURST-H9EF-UEL5-4WPG-DJE6J), not your passphrase.
Once you receive your Burstcoins you’ll need to make a transaction and spend 0.1 BURST fee minimum. Since all we need to do at this point is spend a 0.1 BURST fee we can go ahead and set a receiver for mining, which conveniently costs 0.1 BURST.
We’ll be setting the recipient later when we are setting up the mining client.
Part 3 – Prepare HDD by Writing Plots
Mining Burst uses your HDD as an anti-sybil measure to secure the network and to do so it needs to create plot files on your hard drive. The more space you dedicate to these plots the greater number of BURST you’ll receive when mining.
To get started you’ll want to click on “Tools” at the top and then “Plotting”. This will give you a choice between “Plotter” and “Dynamic Plotting”. You can disregard the third entry of “Plotconverter”. To keep things simple we’re going to use “Dynamic Plotter” since it automatically calculates and plots your HDD.
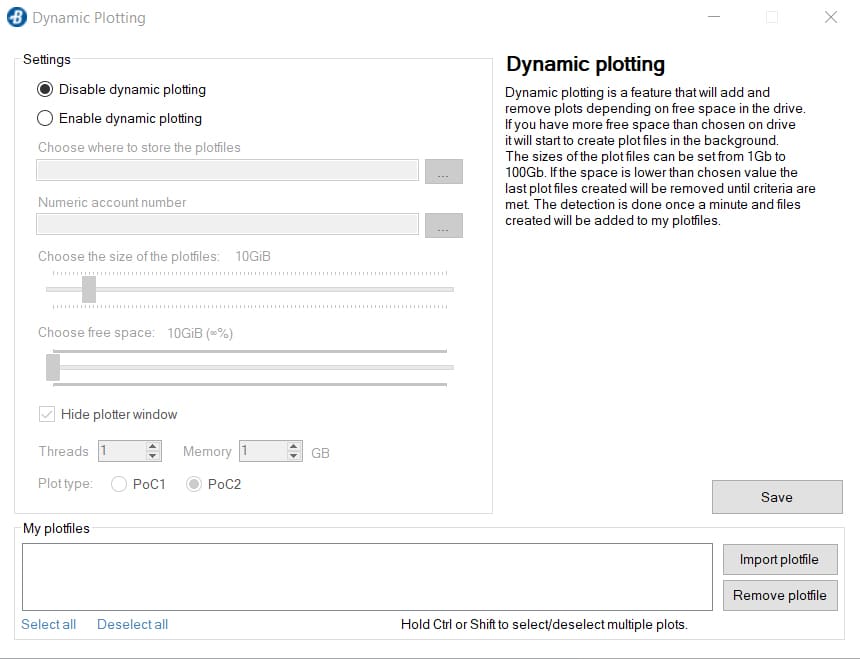 Burstcoin's Dynamic Plotter
Click the radio button to enable dynamic plotting, and then click the three dots to the right of the “Choose where to store the plotfiles files” and choose a location to store the files. I created a new folder called “Burst” to store mine.
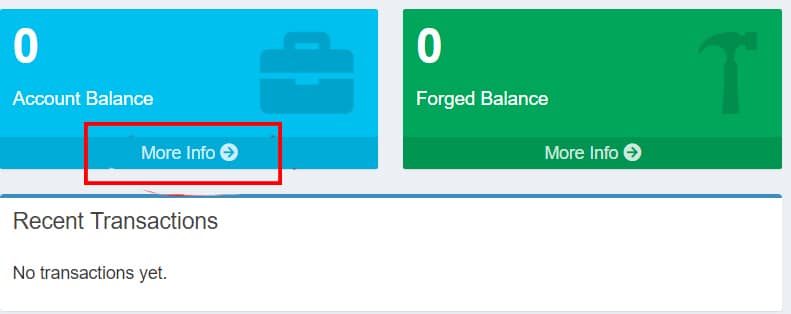
Next you’ll need to input the numeric account number, which can be found by clicking “More info” in the Accounts box in your wallet.
 Numeric Account insertion
You can leave the size of plotfiles and free space as the defaults and click the “Save” button. You’ll get a pop-up message asking if you’d like to download and install XPlotter. Click yes and that component will be added to your wallet.
When you have dynamic plotting enabled Burst won’t actually start writing plots until you begin mining. If you’ve finished downloading the full blockchain and sent a fee already you can begin mining now, otherwise you may have to wait until you receive some BURST to pay a fee, and until the blockchain is finished downloading.
Part 4 – Begin to Mine Burstcoin
Once your plot files are created you can get started mining Burst.
The first thing you’ll need to do is to set a recipient. This tells the mining software who gets the reward if you find a block. You can set this to your own ID if you’re going to solo mine (not worth it unless you have 100 TB or more), or you can set it to the pool ID. By clicking the dots on the right of the field you’ll get a drop-down that has about 10 pools already pre-configured. I am using Burstneon.com as my pool.
You’ll also want to change the "wallet to use" to the online wallet if your local wallet hasn’t finished synching. Take note of the fee and make sure you’ve put enough in to meet the minimum. The field defaults to 0.01, which is the default minimum needed to set a reward recipient. Then click the “Set Reward Recipient” button.
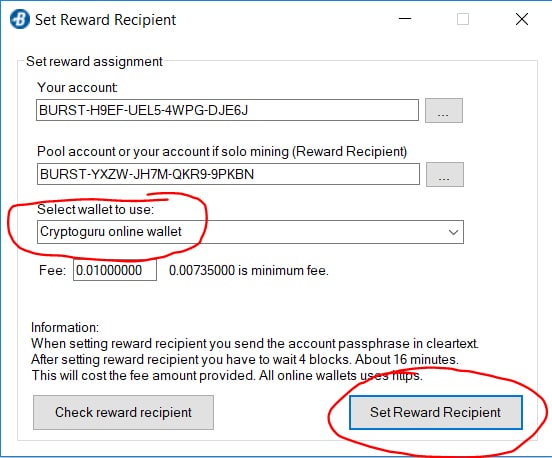 Setting Burstcoin reward recipient
Now you need to start the miner. Go to Tools -> Miner and click. Change the radio button to “Pool Mining”. Again the wallet needs to be synched to do this, and the reward recipient must already be set. Note that it can take 20-30 minutes for the reward recipient to be set in your wallet.
As the mining, update and info servers we’ll use Burstneon.com with a port of 8080. The Deadline Limit should be set to 63072000. Click “Start Mining”. It will ask if you want to install the Blago miner. Click yes and let it install.
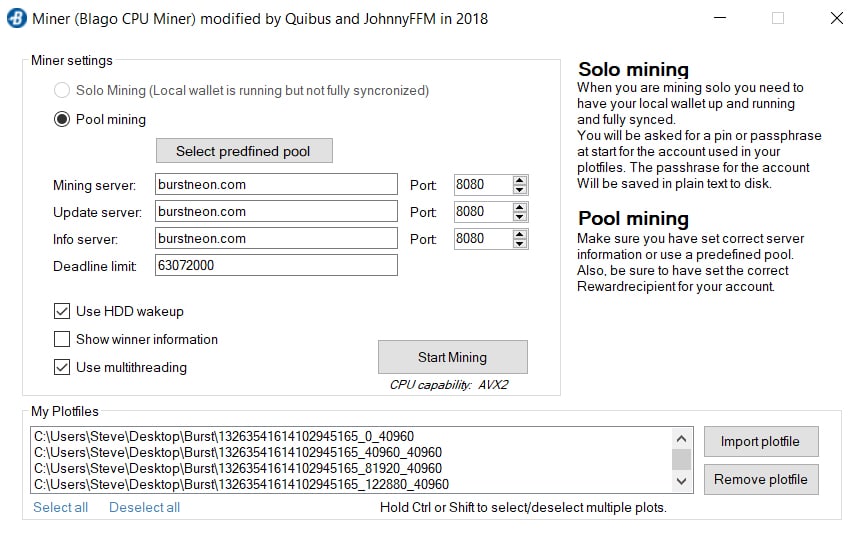 Blago CPU Burstcoin Miner
Note that you will then have to go to the Burst 2.5.0 folder created earlier and find the BlagoMiner.zip folder and extract it, otherwise you’ll continue to get errors and mining won’t begin properly.
And now you’re mining Burst!

Conclusion
Mining Burst is simple and best of all it’s very economical since it uses the HDD of your computer. Once you’re set up and mining there is very little CPU involvement, meaning you won’t see much electricity usage from your Burstcoin mining activities.
The project is also planning on tackling issues related to scalability and anonymity as well as adding new payment channel features. The team says it will integrate a number of protocols and ideas already proven by other cryptocurrencies. This list includes the use of Lightning Networks for payments á la Bitcoin/Litecoin, Tangle technology from IOTA, Anonymity characteristics from Monero and Zcash.
Anyone with a few spare terabytes of hard drive space has nothing to lose by mining some BURST, and if it takes off and heads back to its all-time high there could be quite a bit to be gained from the inexpensive mining of Burstcoins.